Interested in 3D printers but don’t know which one to buy? If you’re looking for a worthy machine, visit Top 3D Shop and check out our 3D printer reviews, we’ll help you choose the machine you need!
Like most engineers, David Choi is rarely satisfied with the results of his work and is constantly in search of new inventions, new products, new options for old solutions. He recently made a Tesla wireless lamp. And today introduced a one-of-a-kind wireless computer on the Raspberry Pi 2 called the PiBook.
“I wanted to use the principle that I made my cordless lamp to make something more useful,” Choi explains. - And what could be more useful than a computer? Raspberry Pi 2 recently came out, and I thought, why not make an open-source wireless computer? The only difference between the power receiving circuit and the lamp circuit is that before applying the alternating voltage must be converted to constant and lower it to a working level that is safe for electronics. "
Not so long ago, Choi still wanted to make a mobile phone case with wireless charging, but he eventually abandoned this idea. But this project helped him to create a unique computer, in particular because he helped to figure out how to make a spiral.
“I knew that there should be few turns in a spiral (one turn is enough), so I made the spiral small so that it fits at the base of the screen,” Choi explains. “Then it remains only to add the rest of the stuffing: Raspberry Pi, video card, voltage transformer, voltage regulator in the spiral and the battery.”
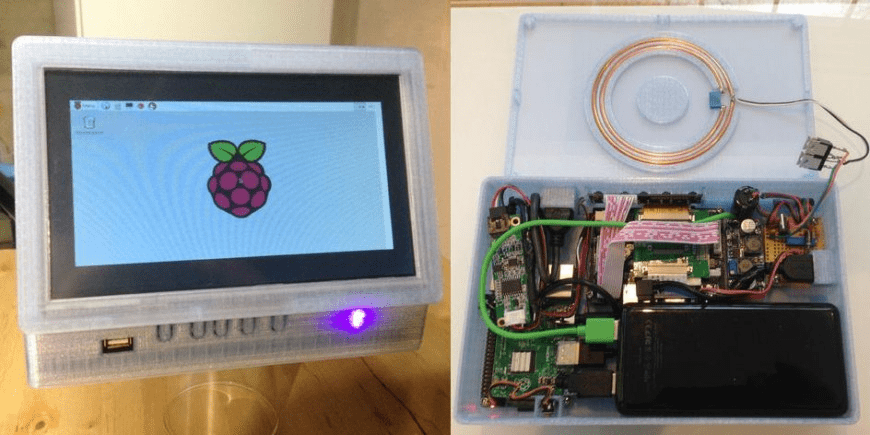
Choi secured a touchscreen board over the Raspberry Pi. Then he installed a voltage transformer that converts the 5 V voltage from the battery to 12 V, which is necessary for the screen to work. He took a voltage regulator and set it to a 5V output voltage to power the battery and the Raspberry Pi so that the PiBook could charge while it was working. In the end, it remains only to install the buttons and connectors in the right places.
All parts except the spiral and electronics were printed on a fifth-generation MakerBot Replicator 3D printer. The PiBook cover, which encloses the screen, is made of two parts (the engineer did not forget about the channels for the wires). 3D-printed buttons protrude three quarters above the case, they are quite elastic and immediately respond to pressing. The case has fasteners for all boards and input / output connectors.
“The hardest part was finding wires that fit snugly in the grooves,” says Choi. “I had to buy four different HDMI cables until I finally found a very thin cable that worked perfectly.”
A custom 6.5 watts emitter of 30 watts is built into the bottom of the PiBook. A small spiral of two turns (0.34 μH) is inductively coupled to a frame antenna (5.80 μH), which is suitable for storing reactive energy. This antenna can also be tuned and introduced into the resonance of 6.5 MHz. The receiver is connected to a 3.3 mf capacitor, which drives the spiral into a 6.5 MHz resonance.
The PiBook runs on electricity, which is transmitted through a magnetic coupling using four spirals. The first coil is the primary field winding, which transfers voltage to the large secondary receiving loop. The third and fourth spirals are single-circuit, while the fourth spiral absorbs the alternating magnetic field of the third loop and transfers 6.5 MHz of alternating voltage to the rectifier through a bridge circuit, which converts it into direct current. And voila! You have a working wireless computer on the Raspberry Pi 2!
Pretty simple, huh? If you think so, then you can download the drawings on the Choa page on the Thingiverse and print your own PiBook. Otherwise, you can just watch the videos in which Choi talks about the PiBook.